Captions & Transcripts
- Add human-generated captioning to a live event
- Add human-generated captions to a recorded event
- About computer-generated transcripts
- Edit a computer-generated transcript
- Add a computer-generated transcript to a recorded event
- Download a computer-generated transcript
- Add computer-generated captioning to a live event
- Add live interpretation with Interprefy
Add human-generated captioning to a live event
The Webcast platform offers options for human-generated or computer-generated captions on an event. Human-generated captions allow for support in multiple language and have an increased accuracy compared to computer-generated captions but require additional steps in the booking and setup process. The computer-generated caption setup is seamlessly integrated directly into the Webcast platform but offers English only captions. Note that computer-generated captions have an increased possibility of transcription errors compared to human-generated captions.
To include human-generated captions, you must request captioning services, set up a Custom Tab with the StreamText embed code, and then invite the captioner as an attendee. On the day of the event, the captioner joins as an attendee and types the captions into StreamText, which are then displayed to the audience in the Custom Tab.
Notes:
- You can't add live captioning to the archived version (replay) of a Live event. To add captions to an event replay, see Add captions to a recorded event.
- Because live captioning is not a feature of this platform, Support is not able to set up, test, or manage captioning for self-service clients. If you would like someone to manage an end-to-end integration, contact your sales representative to arrange a consultation package.
Jump to: Request captioning services | Example code | Set up the live captions tab | Preview your work | StreamText URL formatting
Request captioning services
We can book live captioning for your event.
To request live captioning:
- If you have a Standard or Premiere plan, send us an email at GlobalReservations@webcasts.com.
You can also use your own third-party captioning provider, as long as they use the StreamText platform.
When you request live captioning through us, we provide your event ID to the captioning provider, who uses it to identify your event in their StreamText account. When you set up the custom tab, include this event ID in the embed code. If you schedule your own captioner, we recommend that you give them your event ID to use as their StreamText event name (identifier); confirm the value they used and include it in the embed code. To learn more about the process for scheduling captioning services, contact Support.
Example code
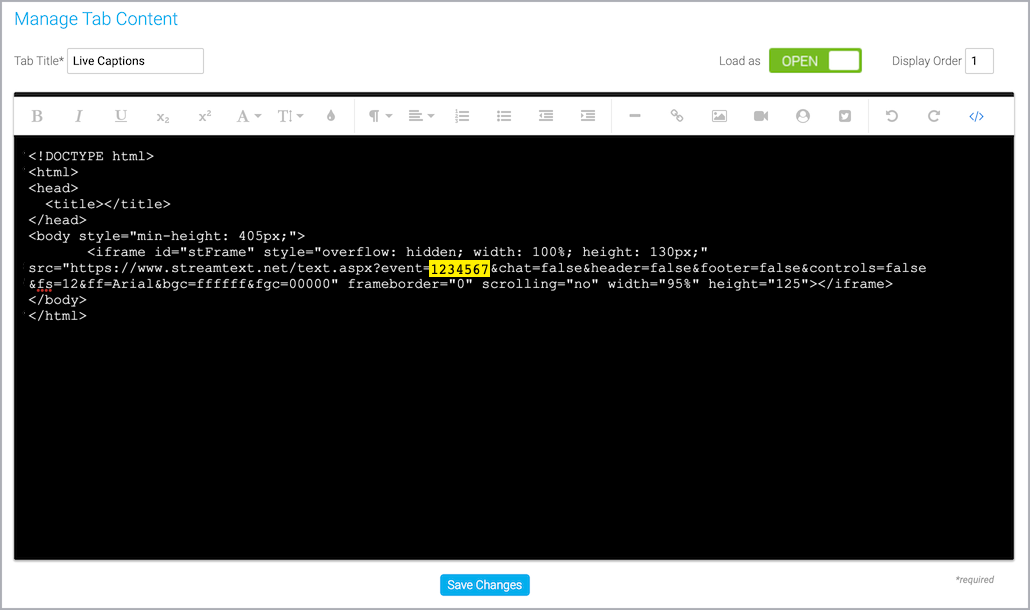
Use the following example code to embed captions in the custom tab. In the code, find event=1234567 in the code and replace 1234567 with the event ID for your event. If you're using your own captioning services, replace 1234567 with the event name provided by the captioner.
Important: If you requested captions in a language other than English, you must include an additional language parameter to the link for them to display correctly. For example, if you requested captions in Spanish, you must add &language=es to the link after the event ID or name. For more information, see StreamText URL formatting.
    <!DOCTYPE html>
    <html>
    <head>
      <title></title>
    </head>
    <body style="min-height: 405px;">
    <iframe id="stFrame" style="overflow: hidden; width: 100%; height: 130px;" src="https://www.streamtext.net/text.aspx?event=1234567&chat=false&header=false&footer=false&controls=false&fs=12&ff=Arial&bgc=ffffff&fgc=00000" frameborder="0" scrolling="no" width="95%" height="125"></iframe>
    </body>
    </html>
Example code for multi-language captions
If your event will have multiple language captions available, code can be added to display all language captions in a single custom tab. Viewers can then use a dropdown menu to select the language of their choice, rather than displaying individual tabs for each language that is included.
    <!DOCTYPE html>
    <html>
    <head>
      <title></title>
    </head>
    <body style="min-height: 405px;">
    <iframe id="stFrame" style="overflow: hidden; width: 100%; height: 130px;" src="https://www.streamtext.net/player?event=1234567&chat=false&header=true&footer=false&controls=true&fs=12&ff=Arial&bgc=ffffff&fgc=00000&controls-language=true&title=false&controls-theme=false&controls-transcript=false&controls-scroll=false&controls-fs=false&controls-ff=false&controls-bgc=false&controls-fgc=false&controls-words=false" frameborder="0" scrolling="no" width="95%" height="125"></iframe>
    </body>
    </html>
Note: With multi-language captions, the dropdown menu will display all available languages when initially setup. Once the captioner has logged in for the event, the dropdown menu will only display the languages booked on the event.
Set up the live captions tab
Sign in to the Webcast Admin portal and edit the Live event.
To add the live captions tab to an event:
- On the left panel, click the Event Content tab.
- Under Optional Content, expand the Add Custom Player Tabs section and click Add Sidebar Tab.
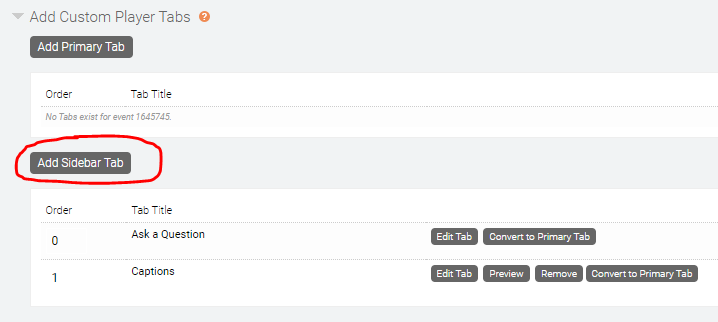
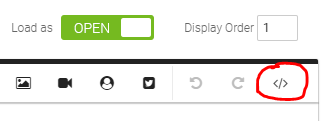
- Enter a name for the captioning tab and set Load As to Open. Optional: The Q&A tab displays under the video player in your event by default. To have the captions display under the video player, use the Display Order field to change the tab order.

- At the right side of the editor, click </> to switch to code view.
- Delete all the placeholder code.
- Copy the example code (see above) and paste it into the editor.
- In the code, find event=1234567 and replace 1234567 with the seven-digit event ID for your event or the event name.
Note: If your captions are in a language other than English, be sure to include the language parameter in the link.

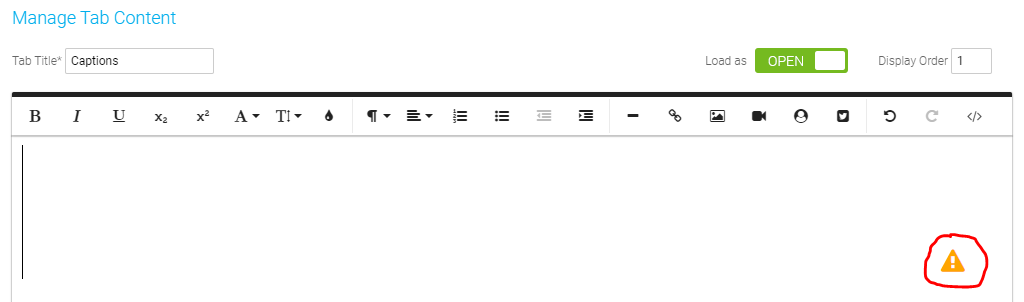
- Click </> to switch out of the code view to review the setup. You should see a "!" icon in the lower right of the tab setup. This icon indicates that the captioner has not logged in for the event yet, but confirms that the captions have been setup correctly.

- Click Save Changes to save the coding. Then click Save and Continue to save changes to the event content.


Preview your work
Always preview the tab setup before the Live event.
To test captioning for your event:
- In the Webcast Admin portal, edit the event.
- On the Event Content tab, edit the sidebar tab you created for captioning and replace your event ID or name with ihaveadream.
...src="https://www.streamtext.net/text.aspx?event= ihaveadream &chat=false...
- Click Save Changes to save the coding. Then click Save and Continue to save changes to the event content.
- Now preview the web player: click the Event Summary tab and at the top of the page, click View My Event .
Make any changes to the display. When ready, go back and place your event ID in the sidebar tab coding.
StreamText URL formatting
The captions can be visually controlled by passing various query strings (parameters) in the URL. Here are the options used in our example code; we hide various elements to ensure captions display well in a sidebar tab. For a complete list of options, see this StreamText help article.
| Query String | Purpose | Used in our example code | Result |
|---|---|---|---|
| language |
Required for displaying captions other than English. The ISO 639-1 code for the caption language. Examples: |
N/A | English captions |
| chat | Displays the chat box | &chat=false | Chat box hidden |
| header | Displays the title and the controls | &header=false | Header hidden |
| footer | Displays gray footer with copyright | &footer=false | Footer hidden |
| controls | Displays a toolbar that allows each attendee to change the font, sizing, and other formatting of the captions they're viewing | &controls=false | Controls hidden |
| fs | Font size | &fs=12 | 12 pt font |
| ff | Font family | &ff=Arial | Arial font |
| bgc | Background color | &bgc=FFFFFF | White background |
| fgc | Foreground color; sets the text color | &fgc=00000 | Black text |
Add human-generated captions to a recorded event
To add captions to a replay or to an On-Demand or Simulated Live event, you need a timed caption file in VTT (WebVTT) format. A timed caption file contains the text of what is said in the recording, plus time codes for when each line of text should be displayed. You can request a caption file for your event or ask your captioning provider for a compatible file.
Notes:
- Captioning during a Live event is not included in the event replay.
- Additional instructions on setting up real-time captioning for Live events can be accessed in the Knowledge Base.
Once you receive the caption file, upload the file in the setup of your event. You can offer captions for your event in different languages; just upload a separate timed caption file for each language you want to provide. Captions are shown inline with the video. You can display them automatically or allow attendees to turn them on as needed. Attendees can turn captions off at any time.
Important: Captions are timed with the event audio. If you edit an event recording after receiving a caption file, the captions will be out of sync. You must request a new caption file.
Jump to: Request captioning services | Add replay captions | Preview your work

Request captioning services
We can provide a timed caption file for your event. If you edited your event recording after requesting captions, you must request a new caption file.
To request replay captions:
- If you have a Standard or Premiere plan, send us an email at GlobalReservations@webcasts.com.
- If you have an Essential, Professional, or Enterprise webcast plan, go to the Professional Services Request site.
Add replay captions
To add replay captions to an event:
- Sign in to the Webcast Admin portal and edit the event.
- On the left panel, click the Event Content
- Under Optional Content, expand the Upload VTT Replay Captions section and click Upload Caption file.

- Click Choose File and select the caption file.
- Use the Choose Language dropdown to select the language for your captions.
- Click Upload to add the captions to your event.

- A message displays to let you know the captions were successfully uploaded. Click Ok to close the message.
- Update the Display Language field to change the name viewers will see when accessing the captions.

- If you have caption files in additional languages, repeat these steps to upload them.
- Optional - To automatically display the captions to the audience, select Display captions by default checkbox.
- If multiple captions are uploaded, use the Default column to select which language will appear to viewers by default.
- Click Save and Continue at the bottom of the page.
Preview your work
You should always preview your captions and make sure they are timed correctly with the event audio.
To test captioning for your event:
- In the Webcast Admin portal, edit the event.
- On the Event Summary tab, under Review My Event, click View Event.
- Register for the event to view it as an attendee.
- In the event window, point to the video player, click the Subtitles button and set Captions to On. If you selected Display by Default, the captions automatically display.
About computer-generated transcripts
Automated transcripts are available for any type of event - Live, On-Demand, and Simulated Live. Automated transcripts are great for capturing the event audio in a file for your own use and for providing synced captions with a searchable transcript for people watching the event recording. You can also allow attendees to download the transcript.
The system uses the event audio to generate the transcript, including primary media clips and overlay videos. Generated transcripts are available within 24 hours of a Live event ending or a recorded event being published.
Note: Automatic transcription and key phrases might not be available on your account. To request these features, contact Support or your sales representative.
To generate an automated transcript for an event, go to the Event Content tab and open the Add Automated Transcript section.
Edit the recording and update the transcript
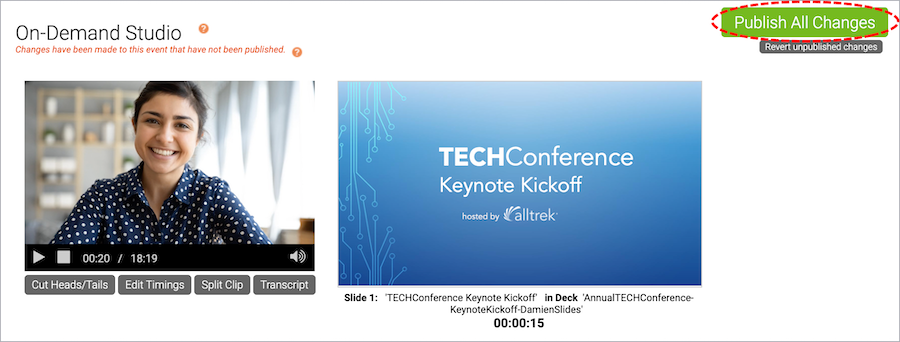
After the event has been published or archived, review the recording and make any edits to the event content. Publish your changes to update the event audio and transcript timings. The system processes the event recording, generates a new version of the transcript, and republishes the event. This is an automated process, so you can edit the event and republish the recording as many times as you need.
Review the transcript
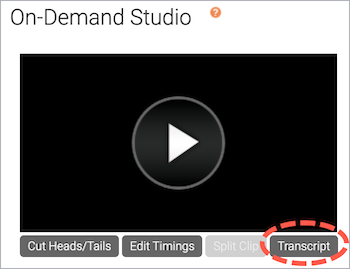
The transcript is computer-generated, so review the transcript for accuracy. To edit it, open the event in the editing studio and click Transcript. When finished, click Save Draft before you close the Edit Transcript window and then republish the event.
Examples
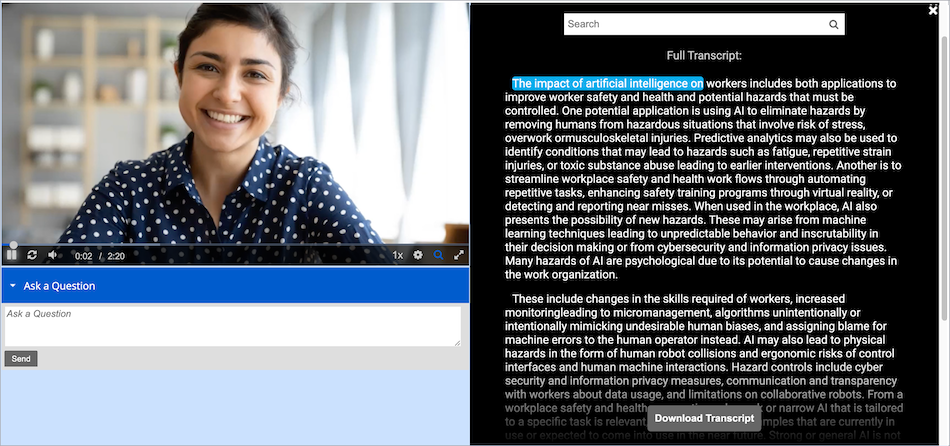
Viewers can open the full transcript in a separate panel and search it. 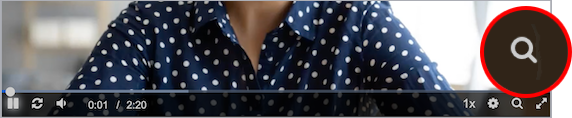
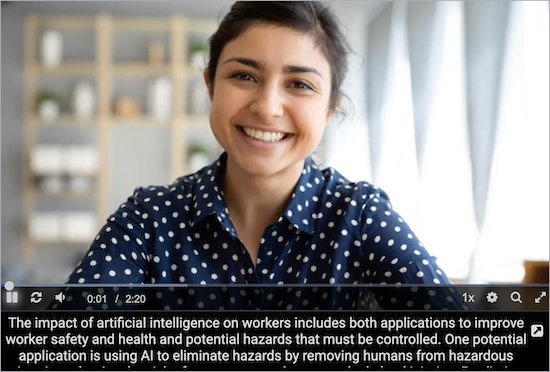
You can also show the generated transcript as scrolling captions under the video player.
Edit a computer-generated transcript
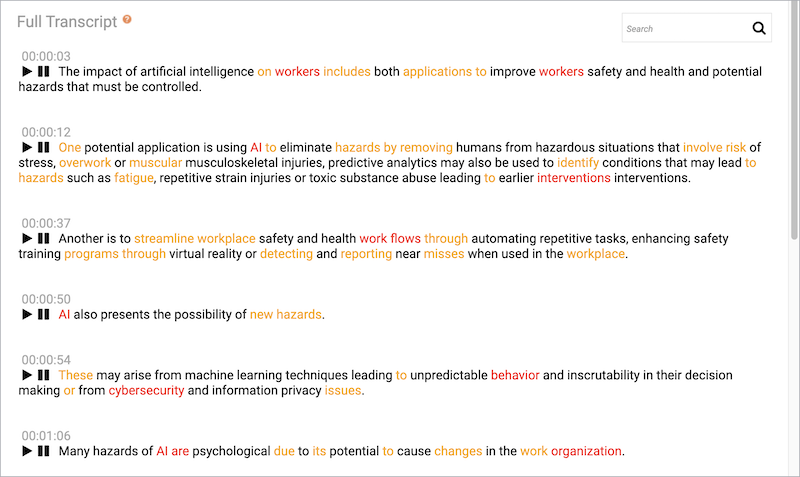
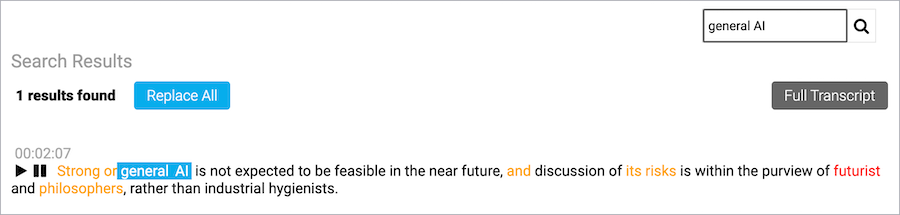
For automated transcripts. You can open a generated transcript in the editing studio and review and edit it. The transcript includes time codes that allow you to play the audio from the beginning of the phrase, so you can compare each transcribed phrase to what was actually said. You can also use the search bar to search for words or phrases in the transcription that you know need to be corrected.
The system uses colors to highlight words that need to be reviewed for accuracy.
- Red indicates a low level of accuracy. Words might be transcribed incorrectly.
- Orange indicates a good level of accuracy. Words are probably transcribed accurately, but might be incorrect.
- Blue indicates text you edited.
Note: When you save the transcript draft, the text you edited changes to black.
After you save your changes and publish the event, the transcript is generated again with your updates. When ready, you can download the new version. If you made the transcript available to the audience, the transcript is also updated in the event recording.
To edit the transcript:
- Sign in to the Webcast Admin portal and edit the event.
- On the Event Summary tab, click Launch On-Demand Studio or Launch SimLive Studio.
- In the editing studio, under the video player, click Transcript.
- The transcript is displayed in the Edit Transcript window. Review the transcript in the Full Transcript section.
To compare the audio to a phrase, click the Play button. To edit the transcribed text, click a phrase and then type your changes. To stop editing, click outside of the phrase.

- To find and replace words or phrases, enter a word or phrase in the search bar and press Enter. Click Replace All, enter what you want to replace the phrase with, and click Apply.
- After you finish your edits, click Save Draft.

- A message displays asking if you're sure you want to save your changes. Click Yes.
- A message displays letting you know the save was successful. Click Ok and then close the Edit Transcript window.
- To save changes and generate a new transcript, in the editing studio, click Publish All Changes.
Add a computer-generated transcript to a recorded event
For English events only.
You can add an automated transcript to an On-Demand or Simulated Live. The system generates a written transcript of the event audio that can be included with the event recording for viewers and downloaded.
To learn more about automated transcripts, see About generated transcripts.
The transcript is available within 24 hours after the event is published. Once the transcript has finished processing, you can review and edit it in the editing studio.
Note: If you plan to make the transcript available to attendees, review the transcript and make any corrections.
To generate a transcript for your event:
- Sign in to the Webcast Admin portal and edit the event.
- On the left panel, click the Event Content tab.
- Under Optional Content, expand the Add Automated Replay Transcript section and set the Generate a searchable, full text transcript to ON.
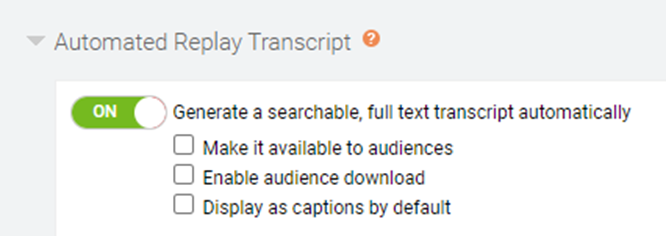
- Optional. Select:
- Make it available to audiences to allow attendees to view a searchable transcript in a separate window
- Enable audience download to allow attendees to download the transcript
- Display as open captions to show the transcript as rolling captions under the video player
- Click Save and Continue to save changes to the event content.
Download a computer-generated transcript
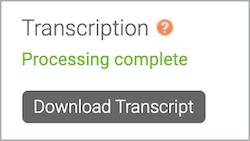
You can download a copy of the event transcript as a .TXT file. Generated transcripts are available within 24 hours of a Live event ending (and being archived) or a recorded event being published.
Note: You can only download the most recently published version of the transcript. You can't download previous versions.
To download a copy of an event transcript:
- Sign in to the Webcast Admin portal and edit the event.
- On the Event Summary tab, in the Event Details section under Transcription, click Download Transcript.
Add computer-generated captioning to a live event
The Webcast platform offers options for human-generated or computer-generated captions on an event. Human-generated captions allow for support in multiple language and have an increased accuracy compared to computer-generated captions but require additional steps in the booking and setup process. The computer-generated caption setup is seamlessly integrated directly into the Webcast platform but offers English only captions. Note that computer-generated captions have an increased possibility of transcription errors compared to human-generated captions.
To include computer-generated captions:
- Sign in to the Webcast Admin portal and edit the Live event.
- In the left panel, click the Event Content
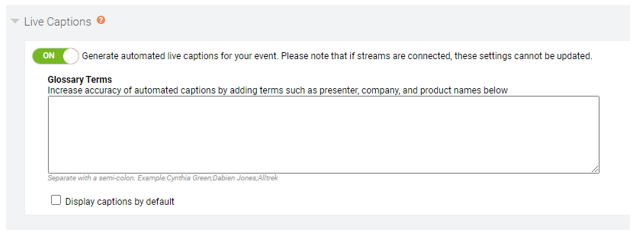
- Under Optional Content, expand the Live Captions
- Switch the Generated automated live captions toggle to ON to add captions to your event.

- Use the Glossary Terms textbox to add a list of terms specific to your event. Include speaker names, product names or other unique terms to improve the accuracy of your captions. Refer to the notes below for best practices for creating a glossary.
- Select the Display captions by default checkbox to display captions automatically to viewers.
Glossary Best Practices
- No special characters or punctuation should be used in the Glossary, with the exception of - and ' to support names and hyphenated words.
- Invalid characters: \ : ! ? ^ * + = ; ~
- Long terms should be shortened or broke into several terms.
- Terms longer than six words should not be used.
- Example:
- Not Supported: "The Central Intelligence Agency of the United States of America"
- Supported: "Central Intelligence Agency" and "United States of America"
- Example:
- Terms longer than six words should not be used.
- Dashes (-) should only be used for hyphenated words or name.
-
- Example: "well-being" and "non-profit"
- Dashes should not be used to indicate an alternative form of a term. Both terms should be included instead.
- Example:
- Not Supported: "CIA - Central Intelligence Agency"
- Supported: "CIA" and "Central Intelligence Agency"
- Example:
-
- Slashes (/) should only be used for words that include slashes internally.
- Example: "N/A"
- Slashes should not be used to list alternatives or related terms. Both terms should be included instead.
- Example:
- Not Supported: "Math / Physics"
- Supported: "Math" and "Physics"
- Example:
- Parentheses ( ( ) ) and brackets ( [ ] ) are used to indicate a different way of expressing the same information. However, when speaking, people tend to use either one or the other, but not both.
- Parentheses and brackets should not be included. Both terms should be included instead.
- Example:
- Not Supported: "FBI (Federal Bureau of Investigation)" and "Federal Bureau of Investigation (FBI)"
- Supported: "FBI" and "Federal Bureau of Investigation"
- Example:
- Parentheses and brackets should not be included. Both terms should be included instead.
- Quotation marks (“”) indicate direct speech but are unnecessary when creating a terminology bank.
-
- Example:
- Not Supported: " "The Rock" "
- Supported: "The Rock"
- Example:
- Exceptions that provide additional information are acceptable.
- Example: "Dwayne "The Rock" Johnson"
-
Notes
- If streams are connected in the Live Studio, these settings cannot be updated.
- Terms should be separated by semicolon.
- The Glossary is limited to 500 terms.
Add live interpretation with Interprefy
Extend your event’s global reach by pairing your webcast with Interprefy's interpretation widget. Interprefy allows multi-language support by providing viewers with real-time interpretation in multiple languages. The audio interpretation widget can be added to Live audio-only or video webcasts.
Note: Webcasts support audio interpretation services only. Video interpretation services are not supported.
Schedule your Interprefy event
Before your event, you must reach out to Interprefy directly to schedule an interpreter and receive an Interprefy widget link.
Your Interprefy widget link should look like this: https://interpret.world/login=widgetdemo
For managed events, you must provide the event production manager with the Interprefy widget link at least 72 hours before the event start time.
Example code
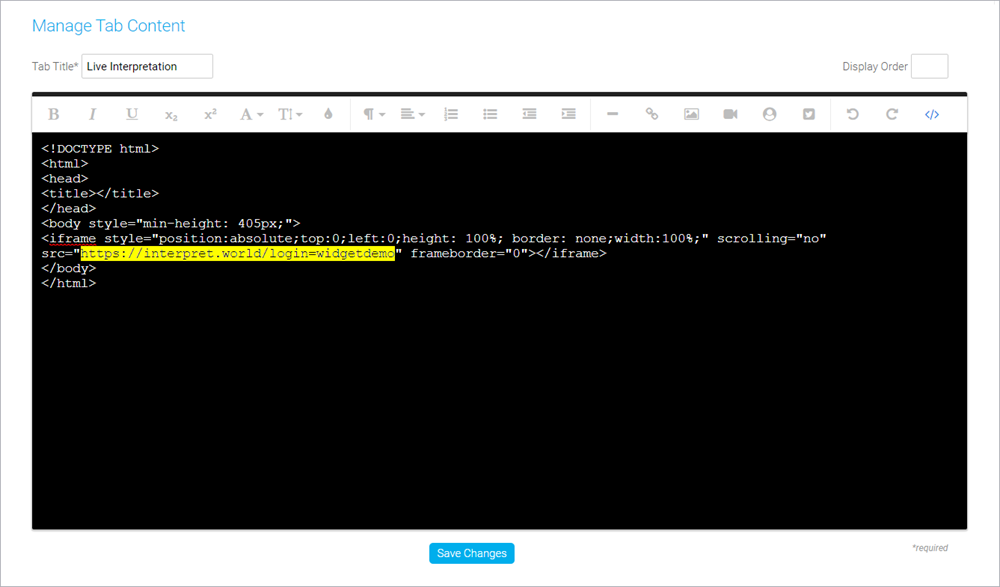
Use the following sample code to embed the Interprefy widget. Replace https://interpret.world/login=widgetdemo with your Interprefy widget link.
<!DOCTYPE html>
<html>
<head>
<title></title>
</head>
<body style="min-height: 405px;">
<iframe style="position:absolute;top:0;left:0;height: 100%; border: none;width:100%;" scrolling="no" src="https://interpret.world/login=widgetdemo" frameborder="0"></iframe>
</body>
</html>
Add the Interprefy widget
Once you have received your link from Interprefy, the widget can be embedded into the webcast player. Sign in to the Webcast Admin portal and edit the Live event to add it.
To add interpretation to an event:
- On the left panel, click the Event Content tab.
- Under Optional Content, expand the Add Custom Player Tabs section and click Add Primary Tab.
- Enter a name for the live interpretation tab.
- At the right side of the text editor, click </> to switch to code view.
- Delete all the placeholder code.
- Copy the example code and paste it in the editor.
- Replace https://interpret.world/login=widgetdemo with your Interprefy widget link for the event.
Note: Your Interprefy link must begin with https:// and contain either of the following expected domains: interprefy.interpret.world, interpret.world.
- Click Save Changes to save the coding. Then click Save and Continue to save changes to the event content.
Preview the widget
You should always preview the tab setup before the Live event.
To test Interprefy for your event:
- In the Webcast Admin portal, edit the event.
- On the Event Content tab, edit the sidebar tab you created for captioning and replace your Interprefy widget link with https://interpret.world/login=widgetdemo.
- Click Save Changes to save the coding. Then click Save and Continue to save changes to the event content.
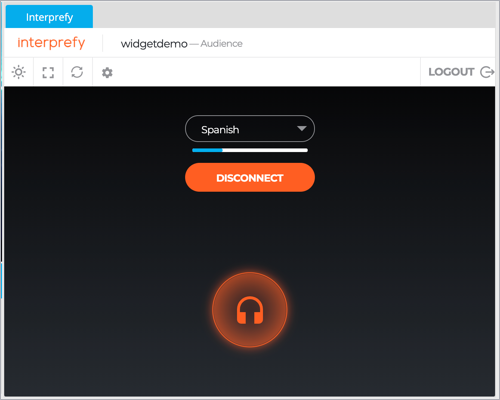
- Now, preview the widget in the web player. On the Event Summary tab and at the top of the page, click View Event.
- In the web player, click the interpretation tab and select a language. The interpretation starts automatically.
Once you've tested Interprefy, go back and update the primary tab coding with your widget link for the event.