Event Setup & Scheduling
- Create and schedule a Live event
- Create an On-Demand event
- Create and schedule a Simulated Live event
- Accessing events and attendee portals in China
- Change a Simulated Live event from live acquisition to pre-recorded content
- Set up and run a Simulated Live event with live Q&A
- Change the event window layout for a recorded event
- Embed a webcast in another website
- Enable layout switching for an event
- Enable third-party analytics for an event
- Limit presenter actions in the Live Studio
- Set up an event in another language
- Set up Guest Administrator accounts
Create and schedule a Live event
Live events are broadcast live at the date and time you schedule. When setting up a Live event, choose how presenters will speak to the audience (on- or off-camera), the length of the event, and the maximum number of attendees allowed.
Note: The event can be from 30 minutes to 8 hours long and can be scheduled at any 5-minute interval on the hour (9:00, 9:05, 9:10, etc.).
To schedule a Live event:
- In the Webcast Admin portal, at the top of the page, click + Create New Event.

- On the Event Settings tab, enter the event name.

- Next to Event Type, select Live with Archive.

- Select the event date and time, duration, and time zone.
- For the Live Acquisition Source, select how presenters will broadcast on the day of the event. If you're broadcasting audio only, select Telephone. If presenters will broadcast live video, select Webcam, Video Bridge, or another source, and then select the location you'll be broadcasting from.
- For Max. Audience Size, select the number of people you expect to attend the event. Access will be limited to this number of simultaneous live viewers.
- Once the event details are complete, at the bottom of the Event Settings tab, click Create Event to proceed with the setup process.
Create an On-Demand event
On-Demand events are recordings that can be watched at any time. When setting up an On-Demand event, select whether the primary media clips (typically presenter narration) you plan to include are audio or video files. This Media setting affects what you can upload to the event and present in the video player (headshots with audio or videos) and the video player size (on the Player & Branding tab). You can include overlay videos regardless of the Media type you select.
After creating the event, go to the Event Content tab to upload your primary media clips, slide decks, videos, and other content you'll share in the event. Then, open the On-Demand Studio and assemble your event. To learn more about uploading clips and assembling the event, see:
- Upload audio clips for use in a recorded event
- Upload videos for use in a recorded event
- Assemble or edit an event recording
Note: The event can be from 30 minutes to 8 hours long.
Jump to: Create an On-Demand event | Allow attendees to view the event
Create an On-Demand event
To create an On-Demand event:
- In the Webcast Admin portal, at the top of the page, click + Create New Event.
- On the Event Settings tab, enter the event name.
- Next to Event Type, select On-Demand.

- Select the event duration.
- Select the type of media you'll be uploading as the primary event content. This affects the size of the video player (on the Player & Branding tab). If you will upload:
- Audio files to play while displaying presenter headshots in the video player, select Audio.
- Video files to use as presenter video in the video player, select Video.
- For the Max. Audience Size, select the number of people you expect to watch the recording at one time. Access to your event will be limited to this specified number of simultaneous viewers.
- Once the event details are complete, at the bottom of the Event Settings tab, click Create Event to proceed with the setup process.
Allow attendees to view the event
Once the event is ready for viewing, make sure to allow attendees to access the event. By default, the event window is closed to attendees to prevent them from viewing the event before it has been assembled.
To allow attendees to access the event:
- Go to the Event Summary tab.
- In the Event Details section, under Event Access, click Manage Access.

- On the Manage Event Access window, set the Player to Open.

- Optional. Set the player to close at a scheduled date and time and update the message attendees see when they join the event when the player is closed.
- Click Save Changes.
Create and schedule a Simulated Live event
Simulated Live events are recordings that are broadcast at the date and time you schedule. You can create a Simulated Live event with pre-recorded media that you upload or schedule a recording session to capture the event content. Either way, you'll use the Simulated Live Studio to finalize and publish the event.
Once the recording is ready, schedule the broadcast. You can re-broadcast a Simulated Live event. After the first Simulated Live broadcast is over, go back to the Event Settings tab and schedule another broadcast.
Note: The event can be from 30 minutes to 8 hours long.
Jump to: Create a Simulated Live event with pre-recorded media | Create and record a Simulated Live event | Schedule a Simulated Live broadcast
Create a Simulated Live event with pre-recorded media
When setting up a Simulated Live event with pre-recorded media, select whether the primary media clips (typically presenter narration) you plan to include are audio or video files. This Media setting affects what you can upload to the event and present in the video player (headshots with audio or videos) and the video player size (on the Player & Branding tab). You can include overlay videos regardless of the Media type you select.
After creating the event, go to the Event Content tab to upload your primary media clips, slide decks, videos, and other content you'll share in the event. Then, open the Simulated Live Studio and assemble your event. To learn more about uploading clips and assembling the event, see:
- Upload audio clips for use in a recorded event
- Upload videos for use in a recorded event
- Assemble or edit an event recording
To create a Simulated Live event and upload pre-recorded media:
- In the Webcast Admin portal, at the top of the page, click + Create New Event.
- On the Event Settings tab, enter the event name.

- Next to Event Type, select Simulated Live.

- Next to SimLive Source, select Upload Media Files.
- Select the event duration.
- Select the type of media you'll be uploading as the primary event content. This affects the size of the video player (in the Player & Branding tab). If you will upload:
- Audio files to play while displaying presenter headshots in the video player, select Audio.
- Video files to use as presenter video in the video player, select Video.
- For the Max. Audience Size, select the number of people you expect to attend the event when it is live. Access to your event will be limited to this specified number of simultaneous viewers.
Note: You can update the number of attendees when scheduling the Simulated Live broadcast.
- Once the event details are complete, at the bottom of the Event Settings tab, click Create Event to proceed with the setup process.
Create and record a Simulated Live event
When setting up a Simulated Live event with a recording session, schedule the session, upload content, and on the day of the session, use the Live Studio to record the event. When the recording is complete, you'll be able to edit it in the Simulated Live Studio. To learn more about editing the recording, see Assemble or edit an event recording.
To create a Simulated Live event and schedule a recording session:
- In the Webcast Admin portal, at the top of the page, click + Create New Event.
- On the Event Settings tab, enter the event name.
- Next to Event Type, select Simulated Live.


- Next to SimLive Source, select Record Media.
- Select the date and time, duration, and time zone for the recording session.
- For the Capture Acquisition Source, select how presenters will broadcast on the day of the recording session. If you're broadcasting audio only, select Telephone. If you plan to broadcast live video, select another broadcast type and select the location you'll be broadcasting from.
- For the Max. Audience Size, select the number of people you expect to attend the event when it is live. Access to your event will be limited to this specified number of simultaneous viewers.
Note: You can update the number of attendees when scheduling the Simulated Live broadcast.
- At the bottom of the Event Settings tab, click Create Event to proceed with the setup process.
Schedule a Simulated Live broadcast
Once your recording has been finalized and published in the Simulated Live Studio, schedule when you want the event to be broadcast. Once you schedule a broadcast, attendees can access the event, but the recording won't be played until the scheduled date and time.
To schedule a Simulated Live broadcast:
- Go to the Event Settings tab for the event and under Event Type, click Schedule a New Broadcast.

- Select the event date and time and time zone.

- Optional. If the number of people attending the broadcast is different from the number you selected when creating the event, update the Max. Audience Size.
- Click Save and Continue.
After you broadcast a Simulated Live event, it is added to the list of previous broadcasts above the Schedule a New Broadcast button. The event in this example has been broadcast two times.

Accessing events and attendee portals in China
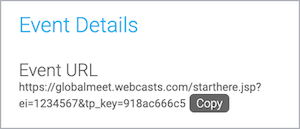
Due to internet restrictions on China, some viewers may have trouble accessing the standard Event URL for a presentation. For viewers in China, the Event URL can be updated to allow them access to a local Chinese server. Please refer to the example below, which has the required update highlighted. The link needs to be updated to replace "webcasts.com" with "cnwebcasts.cn".
Standard Event URL Example: https://event.webcasts.com/starthere.jsp?ei=1283888&tp_key=2760b09e10
Chinese Event URL Example: https://event.cnwebcasts.cn/starthere.jsp?ei=1283888&tp_key=2760b09e10
This update will work for all Live, On-Demand, or Simulated Live presentations. Both links will point to the same event and all users show up in one report. You will not need to run two events, just distribute the appropriate link to your audience based on their viewing location.
This also works for portals. When you provide a China-based link for the portal, the change flows down to all linked events. All events accessed from that alternate portal link automatically go to a China-based event URL.
Change a Simulated Live event from live acquisition to pre-recorded content
If you schedule a Simulated Live event to be recorded and then decide you'd rather upload pre-recorded media, you cannot convert the event directly. Instead:
- Before you begin, create a custom calendar reminder for the actual broadcast date and update the event landing page.
- Run the event briefly to create an archive that you can edit.
- Open the archive in the SimLive Studio where you can upload media and assemble and publish the event.
- Go back to the Event Settings tab and schedule the Simulated Live broadcast.
- Finally, set up follow-up emails to act as event reminders for registered attendees. For more information, see Send reminder emails for a converted Simulated Live event.
This article walks you through the process.
Jump to: Before you begin | Run and archive the event | Upload pre-recorded content and publish | Schedule the broadcast
Before you begin
The original + Add to Calendar button has the wrong date and time. Create a custom calendar reminder and replace the __REMINDERBUTTON__ auto-field with the auto-field for the custom reminder (for example, __REMINDERBUTTON1__). To learn more, see custom calendar reminders in Auto-fields for event landing pages.
Before you run the event, manually set the event date and time on the landing page so attendees can continue to register and make sure the event window stays closed while you're editing.
The event date and time on the landing page will change as you work with the event. To avoid confusion, manually set the event date and time and optionally, update the + Add to Calendar button.
To update the event date and time on the landing page:
- On the left panel, click the Registration tab.
- In the Customize Event Landing Page section, open the Landing Page Content section, and next to Date Bar Text, delete the __DATE__ and __REMINDERBUTTON__ auto-fields.
- In the Date Bar Text field, enter the date and time the event will be broadcast, followed by the __REMINDERBUTTON#__ auto-field for the custom calendar reminder you created.

- Click Save and Continue.
To close the event window to attendees:
Because the event is a Simulated Live recording, the player is set to Closed until it is archived. Change the setting so that it remains closed until you are finished editing and publishing.
- On the left panel, click the Event Summary tab.
- Under Event Access, click Manage Access.
- Next to At the end of the live event, archive will be, select Closed until it is manually opened.

- Click Save Changes.
Run and archive the event
To create an archive that you can edit, run the event briefly. When you're ready, set the event date to the current day and time, and then start the broadcast.
To archive the event:
- On the left panel, click the Event Settings tab.
- Under Event Type, schedule the event to be captured immediately and click Save and Continue.

- On the Event Summary tab, under Run My Event, click Launch Live Studio.
- In the Live Studio, start the event, let the event run for a few minutes, and then end it. Once you end the event, it will automatically be archived.
Upload pre-recorded content and publish
Wait until the event is archived, then launch the SimLive Studio, upload media files, organize them on the event timeline, and finally publish the event.
Note: You can also upload media on the Event Content tab. Again, wait until archiving finishes or you will only be able to upload overlay videos.
To upload pre-recorded content:
- On the Event Summary tab, under Run My Event, click Launch SimLive Studio.
- Delete the content from the broadcast that created the archive. Under Event Timeline, right-click Live Clip 1 and click Remove Clip.
A warning message is displayed asking if you really want to delete the clip. Click Yes.
- Upload videos and audio files to the event.
- Drag the clips you uploaded to the event timeline and then click Publish All Changes.
You'll receive an email when the event has been published.
Schedule the broadcast
Now that the event is ready for broadcast, schedule it and reopen the player.
To schedule the new broadcast:
- On the left panel, click the Event Settings tab, and then click Schedule A New Broadcast.
- Select a date, time, and time zone for the broadcast, and click Save and Continue.

- To make sure attendees can access the event on the day of the broadcast, on the Event Summary tab, under Event Access, click Manage Access, set the Player option to Open, and click Save Changes.
Set up and run a Simulated Live event with live Q&A
By default, attendees type their questions in the Ask a Question box during the Simulated Live event and presenters answer them in the Q&A queue. To have a live Q&A session after a Simulated Live event, you can create a Live event for Q&A and automatically send attendees to the event when the Simulated Live event ends.
Jump to: Overview | Set up the events | Set up the exit URL | Run the Simulated Live event | Run the Live Q&A event | After the event
When attendees are redirected, they bypass the registration page for the Live event, so they only need to register for the Simulated Live event. Their registration data is passed from the Simulated Live event to the Live event and is included in the Live event reports.
On the day of the event, before the Simulated Live event ends, presenters join the Live Studio to answer questions attendees submitted in the Ask a Question box.
Notes:
- To set up a Simulated Live event with a live Q&A event, you must have access to the Exit URL and Pass Data Fields features. To have the features set up for your account, contact Support.
- If you’d like to allow attendees to ask questions over the phone, add an operator-assisted phone bridge to the Live event. To request an operator-assisted bridge, send an email to GlobalReservations@webcasts.com.
Set up the events
To set up the Simulated Live event with a Live event for Q&A, create the two events and then set up the redirect from the Simulated Live event to the Live Q&A event.
First, create and schedule the Simulated Live event.
Then, create and schedule the Live event to begin a few minutes before the Simulated Live event ends.
By default, attendees can submit questions during the Simulated Live and the Live events. If you’d like to take questions only during the Live event, go to the Player & Branding tab, and under Audience Questions, clear the Allow during SimLive event checkbox.
Notes:
- On the Registration tab, you must select Email and the same registration questions for both events to pass data fields to the Live event. You can’t use anonymous registration.
- To give attendees the same experience as the Simulated Live event, upload the same slides and content to the Live event.
- If you plan to include a Post-Event Survey, the survey should be setup in the Live event. Including a Post-Event Survey at the end of the Simulated Live event will require viewers to complete the survey first before joining the Q&A. Viewers not completing the survey would need reach the Q&A.
Set up the Exit URL for the Simulated Live event
Set the exit URL for the Simulated Live event to automatically send attendees to the Live event for the Q&A session.
Note: If you plan to convert the Simulated Live to an On-Demand event and make it available for replay, you can also set the exit URL for the Live event so that attendees are sent back to the Simulated Live event when the Q&A session ends.
To set the Exit URL for the Simulated Live event:
- Edit the Live event and on the Event Summary tab, under Event Details, copy the event link.

- Edit the Simulated Live event.
- On the left panel, go to the Player & Branding tab.
- Under Exit URL, paste the link for the Live event and select Do not show to viewers who exit the event early.

- Under Pass Data fields to Exit URL, click Edit Fields.
- On the Passed Data Fields window, select the attendee registration data you want to include in the Live event reports. You can select First Name, Last Name, Company, and Email.

- Click Save Changes.
- Click Save and Continue.
Run the Simulated Live event
On the day of the event, the Simulated Live event runs automatically at the scheduled broadcast date and time. While the event is running, you can manage the event from the Event Summary tab. You can:
- Send a message to the audience
- View the total number of attendees watching the event and view a list of attendees and their registration information
- Answer, sort, and delete questions attendees submitted

If you turned on Audience Questions for the Simulated Live event and plan to answer the questions during the Live event, in the Manage Q&A window, you can export the questions as a CSV file.
![]()
Run the Live Q&A event
At least 15 minutes before the Simulated Live event ends, have presenters join the Live Studio and start the event. This ensures that the event is live and content is visible to attendees when they join.
Tip: If you plan to make the Q&A session available for replay, make sure presenters are muted while attendees join the Live event. This makes it easier to edit the recording later.
When the Simulated Live event ends, attendees automatically join the Live event for the Q&A session. You can check the number of attendees that joined the Live event at the top of the Live Studio.
If you exported questions from the Simulated Live event, you can add them to the Q&A queue for the Live event. In the Manage Q&A queue, click the Ask a Question button, enter the attendee’s email address and their question, and click Submit Question.
Note: When you add a question to the Q&A queue, only the attendee email address and the question are included in the event reports.

After the event
By default, Simulated Live events are not available for replay.
To make a single Simulated Live broadcast with a Live Q&A available for replay, convert the Simulated Live event to an On-Demand event. Then, edit the recording and remove the content at the beginning of the recording before you start the Q&A session. To learn more see, Assemble or edit an event recording. You can also optionally send attendees back to the Simulated Live event when the Live event ends.
To schedule a new Simulated Live broadcast with a live Q&A session, create a new Live event and update the exit URL with the new Live event link.
Important: If you schedule a new broadcast without updating the Exit URL, attendees are redirected to the live Q&A event replay instead of the new live Q&A session.
Change the event window layout for a recorded event
For Live, On-Demand, and Simulated Live events. Use layout switching in a recorded event to change the view and highlight different types of content. In the editing studio, set layout changes on the event timeline. Attendees will see the different layouts while watching the finished recording. The available layouts depend on the media type (for On-Demand and Simulated Live events) you selected in the event setup or the broadcast type and player size of the original event (for Live event replays). To learn more, see Enable layout switching for an event.
To learn more about editing a recorded event, see Assemble or edit an event recording.
To change the event window layout:
- Go to the Event Summary tab and click Launch On-Demand Studio or Launch SimLive Studio.
- In the editing studio, under the event timeline, click the Layouts button.

The available layouts are displayed in the Layout Library.

- In the Layouts Library, select a layout thumbnail and drag and drop it to the Layouts track on the event timeline.

To remove a layout change, right-click the layout and click Remove Layout.

- Once finished, click Publish All Changes.

Embed a webcast in another website
You can embed your webcast in another website using an iframe element. Depending on your desired setup, you can customize the embed code to show the webcast player immediately or require viewers to register before loading the webcast player. This article includes embed code examples and iFrame and webcast player parameters that can be used to customize how the webcast displays.
Support is not able to assist in customizing code. Any customization is the responsibility of the hosting party.
Jump to: Examples | iFrame Parameters | Webcast Player Parameters
Examples
Example #1 - Embed the event
Use the following sample code to embed your webcast. Replace the event URL with your Event URL.
If your event is set up with registration required, the event's landing page with registration form is displayed and each attendee must register before the webcast player displays. Reporting data for individuals is available.
    <iframe src="
    https://event.webcasts.com/starthere.jsp?ei=1234567&tp_key=bbcffdef6c
    " name="viewer" allow="autoplay" allowfullscreen="true" width="800" height="600" scrolling="no" style="overflow:hidden;" marginheight="0" marginwidth="0" frameborder="0"></iframe>
Example #2 - Let attendees bypass registration
If your event is set up with registration required, you may want to bypass the registration form when the webcast is embedded in another website.
Because attendees will not be required to register to view the event, reporting data on individuals will not be available. If you customize the event's registration form for viewers accessing the event link directly, you will need to customize the embed code to include any additional parameters in the Event URL.
Use the following sample code to embed your webcast and bypass the registration step. In this example, the registration form has four required fields (First Name, Last Name, Company, and Email address); the query parameters fill the required fields with placeholder information. Replace the event URL with your event URL. You can also need to adjust other parameters of the iframe to fit your requirements.
    <iframe src="
    https://event.webcasts.com/starthere.jsp?ei=1234567&tp_key=bbcffdef6c
    &fname=FirstName&lname=LastName&company=CompanyName&email=Email@Address.com
    " name="viewer" allow="autoplay" allowfullscreen="true" width="800" height="600" scrolling="no" style="overflow:hidden;" marginheight="0" marginwidth="0" frameborder="0"></iframe>
Example #3 - Embed the event in a responsive (resizable) iframe
The previous examples set the size of the iFrame to 800 x 600 px. This example sets up basic styling for a responsive "container" to hold the iFrame with the event (notice that the <iframe> code does not set a height or width). The code may need to be customized based on your requirements. This example can be updated to bypass the registration process using the instructions above.
Replace the event URL with your Event URL. You can also need to adjust other parameters of the iframe to fit your requirements.
    <!DOCTYPE html>
    <html>
    <head>
    <title>Responsive iframe example</title>
    <meta name="viewport" content="width=device-width" />
    <style>
    .wrapper {
     	width: 90%;
    	height: 90%;
    	margin: 0 auto;
    	min-width: 319px;
    }
    .resp-container {
       	position: relative;
       	overflow: hidden;
 		padding-top: 56.25%;
    }
    .resp-iframe {
  		position: absolute;
		top: 0;
		left: 0;
		width: 100%;
		height: 100%;
		overflow:hidden;
		border: 0;
     }
    @media only screen and ( max-width: 769px){
        .wrapper{
            width: 100%;
         }
    }
    </style>
    </head>
    <body>
    <div class="wrapper">
    <div class="resp-container">
    <iframe class="resp-iframe" src="
    https://event.webcasts.com/starthere.jsp?ei=1234567&tp_key=bbcffdef6c
    " scrolling="no" allow="autoplay" allowfullscreen="true"></iframe>
    </div>
    </div>
    </body>
    <!-- gesture="media" -->
    </html>
iFrame Parameters
Use standard iframe parameters to customize the iframe used to contain the event. Available options:
- name="X" - Specifies a name for the iframe
- allow="autoplay" - Allows for auto playback of the event within the iframe
- allowfullscreen="true" - Allows you to expand the video to full-screen
- width="X" - Specifies the width (in pixels) of the iframe
- height="X" - Specifies the height (in pixels) of the iframe
- scrolling="no" - Specifies whether or not to display scrollbars in the iframe
- style="X" - Specifies the style elements of the hosted content
- marginheight="X" - Specifies the top and bottom margins of the content of the iframe
- marginwidth="X" - Specifies the left and right margins of the content of the iframe
- frameborder="X" - Specifies whether or not to display a border around the iframe
Webcast Player Parameters
Use the optional &tp_special parameter to hide standard buttons and messages from the player, set the webcast player to fill the entire iFrame, and set the view when Meeting Room view is enabled for the event.
Hide webcast player elements
Add &tp_special=# to the end of the event URL, where # is the element you want to hide. For example, to hide the lobby message:
https://example.webcasts.com/starthere.jsp?ei=1234567&tp_key=0999&tp_special=8The following table explains available options.
| Enter this value | To hide the... |
|---|---|
| &tp_special=2 | Help button |
| &tp_special=4 | Exit button |
| &tp_special=8 | The lobby message displayed before an event begins |
To hide more than one element, add their values together. For example, to hide the Help (2) and Exit (4) buttons, add &tp_special=6 (2+4=6). The following table explains available options.
| Enter this value | To hide the... |
|---|---|
| &tp_special=6 | Help and Exit buttons |
| &tp_special=10 | Help button, lobby message |
| &tp_special=12 | Exit button, lobby message |
| &tp_special=14 | Help button, Exit button, lobby message |
Have the webcast fill the entire iframe
The &tp_special=64 parameter makes the embedded video player adjust to fill the entire available iframe space for a more seamless embedded experience. This applies only to events with high-resolution players (480p or 720p) and no primary tabs for slides, surveys, or custom player tabs.
For example:
https://example.webcasts.com/starthere.jsp?ei=1234567&tp_key=0999&tp_special=64Meeting Room View
If Meeting Room View is enabled for the event, by default attendees are given a choice of viewing the standard full webcast or using the Meeting Room View. You can bypass that screen and send them directly to the Meeting Room View or the standard webcast player. Available options are 16 and 32:
- &tp_special=16 - Meeting Room View
- &tp_special=32 - the standard webcast player
Mute playback (for testing)
The &tp_player=1 option lets you mute the webcast audio. Attendees can unmute it in the player. This is primarily for use in load balance testing, where you would have several instances of the webcast running at one time and want to mute the audio.
For example:
    https://example.webcasts.com/starthere.jsp?ei=1234567&tp_key=0999
    &tp_player=1
Enable layout switching for an event
By default, events with slides or other content tabs show the video player and content side-by-side; audio events show headshots next to content. Layout switching lets you focus on different content - presenters only, video, slides, etc. - by changing the event window layout during the event. You can also set the player layout that is displayed before the event starts.
You can control layout switching for Live, On-Demand, and Simulated Live events.
Jump to: Edit Pre-Live Player Layout | Available layouts | Live Event Controls | On-Demand/Sim-Live Controls | Examples
Edit Pre-Live Player Layout
To edit the pre-live player layout:
- Go to the Player & Branding tab.
- Under Player Layouts, use the Pre-live Player Layout to select your desired layout.
A preview of the default layout is shown.

- Click Save and Continue.

Available layouts
The available layouts depend on the broadcast method and player size you select. Before the event, make sure you select the right player size for the layouts you want to use. To see how each layout looks in the event window, see layout examples.
| Broadcast Type | Video Player Size | Available Layouts |
|---|---|---|
| Video | High resolution 16:9 widescreen
|
Default (Video and Content) Large Video (with small content) Large Content (with small video player) Content Only Video Only |
| Audio | 320 x 240 for headshots | Default (Headshots and Content) Content Only |
Live Event Controls
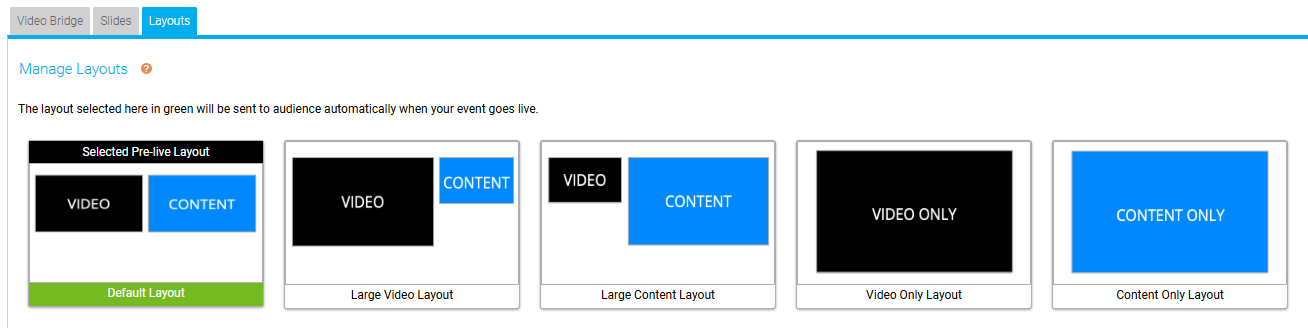
For live events, the layout controls will appear on the Layouts tab of the Live Studio. The layout that will appear to viewers before the event begins will appear with a black bar along the top of the layout before the event begins. The active layout will appear with a green bar along the bottom the layout.
On-Demand/Sim-Live Controls
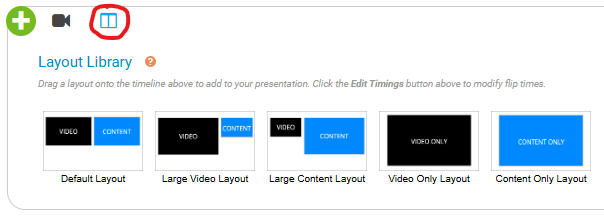
For on-demand or sim-live events, the layouts can be added or edited in the OD/Sim-Live Studio. Access available layouts in the Layouts Library at the bottom of the Studio. Drag and drop your desired layout onto the Layouts track of the Event Timeline to add it to your event at the selected time.
Examples
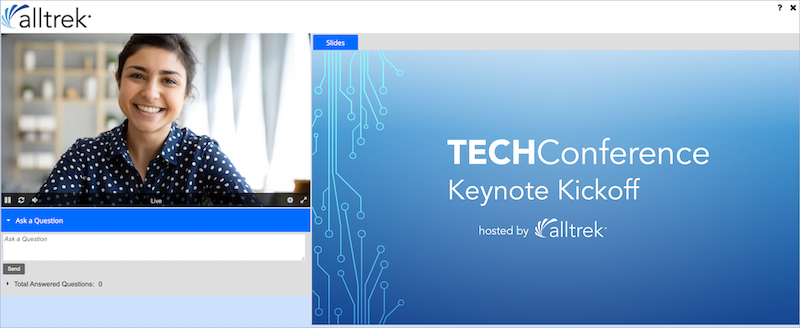
Default layout

Large Video layout

Large Content layout
Content Only layout
Video Only layout
Enable third-party analytics for an event
For more detailed metrics on viewer activity, you can use the Third-Party Analytics feature to send data such as page views, unique viewers, and more to your preferred analytics solution. This feature is available for individual events and portals.
Supported analytics tools are:
- Google Analytics
- HubSpot Analytics
- Facebook Pixel
- Salesforce Pardot Tracking
Data options vary depending on your selected analytics platform. For more details on available data, contact the analytics provider.
To enable third-party analytics for an event:
- Sign in to the Webcast Admin portal and edit the event.
- On the left panel, click the Email & Marketing tab.
- Under Third-party Analytics, select your analytics tool, enter your tracking ID, and then click Update.

- When finished, click Save and Continue.
Limit presenter actions in the Live Studio
Control what your presenters see and what they can interact with in the Live Studio during the event. By default, all presenters can see the:
- Start Webcast and End Webcast buttons
- Audience count and audience list
- Webcast time alerts when the event is about to end
- Phone bridge alerts
- Q&A queue
You can hide the buttons, audience counter, alerts, and the Manage Q&A section for all presenters at any time.
Note: To prevent presenters from accidentally starting or ending the event, we recommend hiding the Start Webcast and End Webcast buttons.
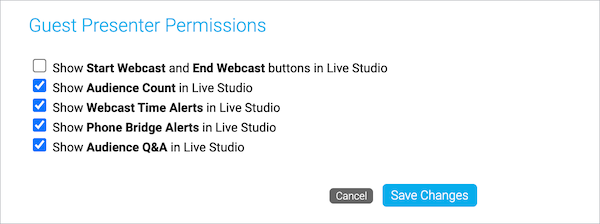
To limit presenter actions:
- Sign in to the Webcast Admin portal and edit the event.
- On the Event Summary tab, next to the Guest Administrators section, click Set Guest Admin Permissions.

- In the Guest Presenter Permissions window, clear the check boxes next to the buttons, alerts, or areas you don't want presenters to have access to.

- Click Save Changes.

Set up an event in another language
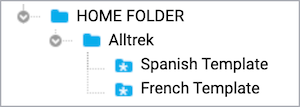
Language templates contain many common text elements translated from English to other languages. If you're hosting an event in another language, we can assign a language template to a specific folder in your account. When you create new events in the folder, the template automatically translates the text on the registration page and the audience event window to that language.
Note: Only new events created in the language template folder are translated. Events moved into the folder from another folder are not translated.
To have language templates set up for your account, contact Support.
Jump to: Translated elements | Available languages | Examples
Translated elements
The following table shows the elements that are translated on the registration page and audience event window.
Notes:
- Language templates don't translate the event __TITLE__ or the __DATE__ auto-fields on the registration page. To customize the title and date, enter them in the Landing Page Content section. To learn more, see Customize the event title and date | Bar layouts or Customize the event title and date | Open layouts.
- Language templates only set the language for the registration page and the audience event window. They don't set the language for the Webcast Admin portal, the Live Studio, or the editing studio.
| Page | Elements translated |
| Registration page | Landing page labels Login form fields Meeting Room View page Registration form fields |
| Event window | Audience chat tab Event resources tab Q&A tab Slides tab Video player Welcome message |
Available languages
You can request templates in the following languages:
- English, American
- Chinese, Simplified
- Chinese, Traditional
- Czech
- Danish
- Dutch
- French
- French, Canadian
- German
- Italian
- Japanese
- Korean
- Polish
- Portuguese, Brazilian
- Romanian
- Spanish
- Turkish
- Vietnamese
Examples
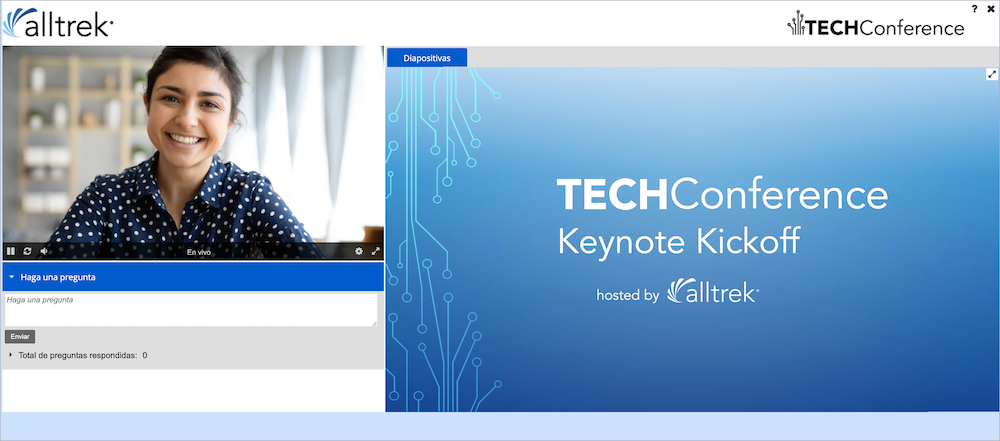
The following examples show an event created within a folder with a Spanish language template. Notice that the Add to Calendar button, registration fields, buttons, and tabs and other text on the event window are in Spanish.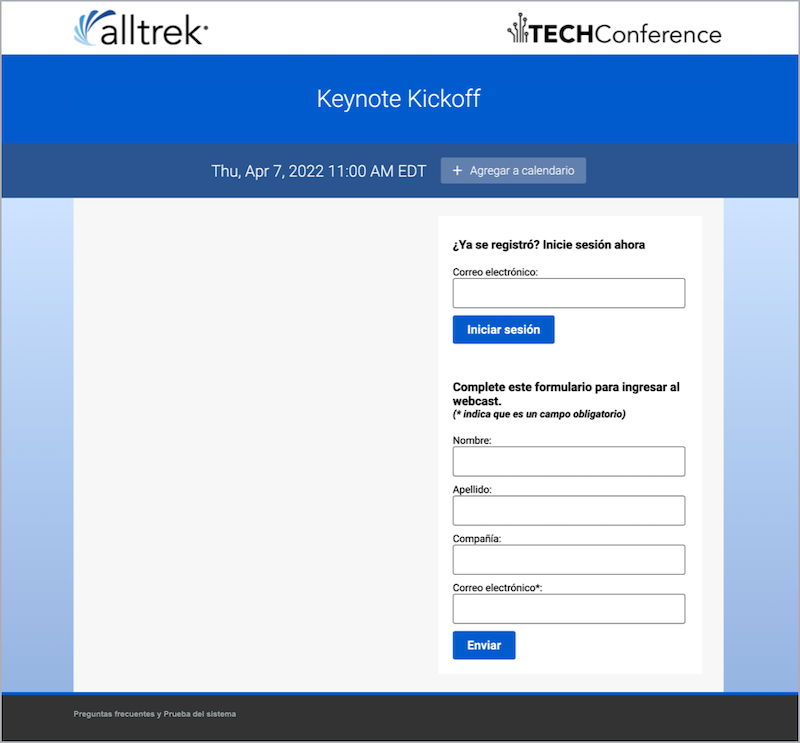
Set up Guest Administrator accounts
After scheduling an event, invite your presenters, moderators, and schedulers and give them Guest Administrator access to allow them to manage aspects of the event. To create Guest Administrator accounts, you must create Guest Admin Access Types. Access Types allow you to set permissions for multiple Guest Administrator accounts at once. For each Access Type, you can allow Guest Administrators to upload event content, edit the On-Demand event or replay, deliver the event, manage Q&A, and generate event reports.
Note: To limit what Guest Admins can see and do during the Live event, see Limit presenter actions in the Live Studio.
There is no maximum number of Guest Administrators that can join the Live Studio for an event. However, if the event is using Video Bridge or Telephone as the acquisition source, only 20 presenters will be able to join the bridge.
To create Access Types and Guest Admin accounts:
- On the Event Summary page, select Guest Administrators and under Access Type, click Create New.

- In the Create Guest Admin Type window, keep individual passwords enabled.
Note: You cannot create individual Guest Admin accounts if you disable Individual Passwords. Instead, presenters will share a PIN and use it to sign in to the event.
- Select the event activities you want to give Guest Admins access to. You can select:
- Live Studio to join and deliver the Live event.
- OD Studio to upload media clips and headshots to the On-Demand event or replay, and edit the event timeline.
- Reports to generate Audience Details and Event Analytics reports for the event.
- Content to upload slides, event resources, and headshots (audio events only).
- Q&A Only to manage Q&A for a Live or Simulated Live event.

- Click Create Guest Admin Type.
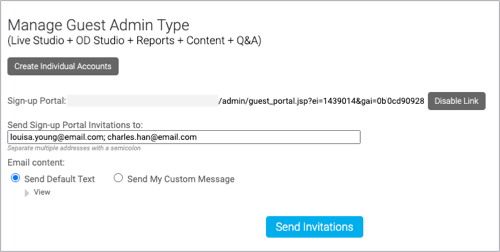
- In the Manage Guest Admin Type window, click either:
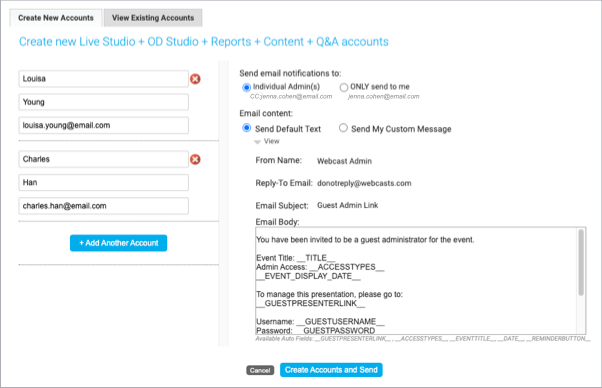
- Create Individual Accounts to set up accounts for each of your Guest Admins. Enter their names and email addresses. Click + Add Another Account to create more accounts. Select who you want to send email notifications to and the email content you want to send, and click Create Accounts and Send.
Note: By default, emails are sent to yourself and to individual Guest Admins. Select ONLY send to me to send the email to yourself. Click Send My Custom Message to edit the email content.

- Enable Sign-up Portal to allow Guest Admins to register for the event and create their own accounts. In the Send Sign-up Portal Invitations to box, enter the email addresses of the people you want to make Guest Admins and click Send Invitations.

- Create Individual Accounts to set up accounts for each of your Guest Admins. Enter their names and email addresses. Click + Add Another Account to create more accounts. Select who you want to send email notifications to and the email content you want to send, and click Create Accounts and Send.
- Repeat these steps to add additional accounts with different access levels. Each Access Type you create displays in the Guest Administrators section where you can add new and manage existing accounts. To add new Guest Admin accounts to an Access Type, click Manage Admins or the Edit button.
After you've created the accounts, Guest Admins receive an email with a link to the Guest Admin site where they can manage the event.


To update a Guest Admin account:
- In the Guest Administrators section, next to an Access Type, click Manage Admins.
- Click the View Existing Accounts tab.
- Next to a Guest Admin account, you can click the:
- Reset Password to send a new Guest Admin email with a new, randomly generated password.
Note: Existing passwords cannot be resent. Accounts that require resending login details will receive a new password from the system and the old password will no longer be valid.
- Edit button to change the name on the account.
- Delete button to remove the account from the Access Type.
- Reset Password to send a new Guest Admin email with a new, randomly generated password.