# Recordings
# Assemble or edit an event recording
Use the editing studio to make simple edits to recorded content and to assemble content for any type of event. You can add and remove audio or video clips, slides, headshots (telephone broadcasts), surveys and survey results, and layout changes if you turned on Layout Switching. You can also change the start and end times of the event, cut out parts of the event audio and video, change the times that content is presented, and add jump points to specific parts of the event.
**Notes:**
- For detailed edits, we recommend using dedicated video editing software.
- The editing studio goes by different names depending on the type of event: On-Demand Studio for On-Demand events and archived Live events; SimLive Studio for Simulated Live events.
Jump to: [Before you begin](#bkmrk--4) | [Access the editor](#bkmrk--5) | [Add event content](#bkmrk--6) | [Edit the recording](#bkmrk--7) | [Publish the event](#bkmrk--8)
# Before you begin
The editing studio automatically saves your changes as you edit and keeps a history of those changes while you are editing. The Undo button lets you cancel each change you made, in reverse order (starting with the most recent).
When you close the editor, it ends an editing “session” and all changes are saved (there isn't a Save button). The next time you open the editor, the Undo button is disabled - you can't undo changes from the previous editing session. However, you can reverse out all changes and revert to the last published version - just click **Revert Unpublished Changes**. Attendees won't see your edits until you click **Publish All Changes**.
# Access the editor
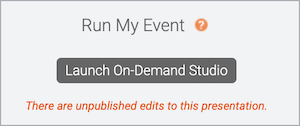
To start editing or assembling an event, on the Event Summary tab, click **Launch On-Demand Studio** or **Launch SimLive Studio**. A notice displays if you have unpublished edits to the event.
[](https://help.webcasts.com/uploads/images/gallery/2022-05/Kb3pgQPNjywB8mMo-launchodstudio.jpeg)
# Add event content
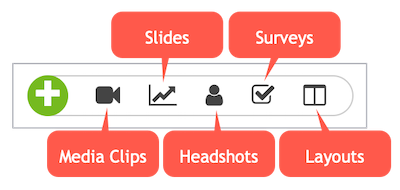
The event timeline is where you'll edit or assemble the event. It contains tracks for all types of event content: the Media track for audio and video clips and overlay videos, the Slides track, the Headshots track (Telephone broadcasts only), the Surveys track, and the Layouts track.
If you are editing an archived Live event recording, the event timeline already contains the audio or video clip, slides, headshots, surveys, and layouts presented during the event. If you're assembling an event from scratch, the event timeline is empty.
[](https://help.webcasts.com/uploads/images/gallery/2022-05/xusKcqctFEfKRfEW-odstudio-hero.jpeg)
The content you uploaded on the Event Content tab when you set up the event is available in the content libraries. To add content to the recording, under the timeline, click the **Media Clips**, **Slides**, **Headshots**, **Surveys**, and **Layouts** buttons to expand the content library and then drag and drop content onto the appropriate track on the timeline. You can also optionally click the **Add (+)** button to expand the Media Clips library.
[](https://help.webcasts.com/uploads/images/gallery/2022-05/sCH9JpPy5MEkaPVg-cliplibrary-buttonscallouts-cropped.jpeg)
# Edit the content and timings
After you add content, on the video player, click **Play** to run through the content on the event timeline and review placement and timing. The clips and headshots on the timeline play in the video player on the left, and the slides and surveys are displayed on the right. After you click Play, you can click and drag the green marker on the event timeline to go to any point in the event.
Then, use the timeline and video player options to adjust individual elements in the recording.
[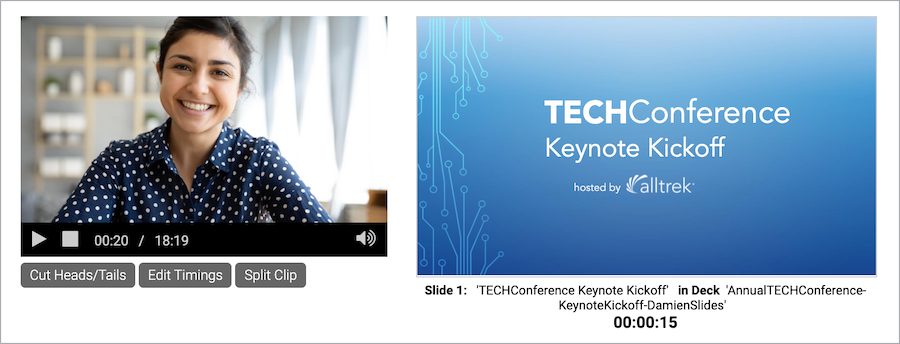](https://help.webcasts.com/uploads/images/gallery/2022-05/uvnvC78dmxDVv9Qr-odstudio-videoslidesplayer.jpeg)
On the event timeline, right-click a:
- **Clip** to play it, edit the clip duration, replace it with another clip you uploaded to the event, or remove it
- **Slide** to edit the timings, replace it with another slide you uploaded to the event, remove it, or add or edit slide animations
- **Survey** to remove it
- **Headshot** to edit the timings or remove it
Under the video player, click:
- **Cut Heads/Tails** to change the start and end times of the event
- **Edit Timings** to add Jump Points to the event
- **Split Clip** to cut a live or primary clip into two **Note:** You can't split overlay videos.
When you're finished editing, a message displays asking you to Adjust Event Timings. Click **Yes**.
**Important:** If you click **No**, the slides and other content may become out of sync with the event audio or video.
# Publish the event
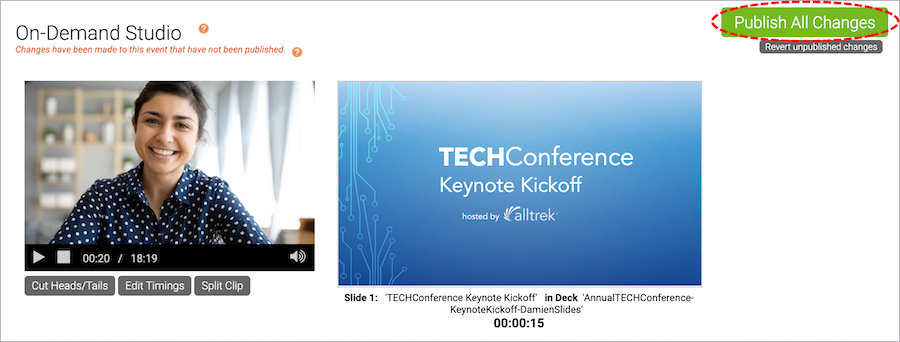
Once your edits are complete, be sure to review them. On the video player, click **Play** to run through the updated timing and content. When you're ready to finalize changes to the event, in the top right corner of the editing studio, click **Publish All Changes**. Publishing the event updates the event replay and the downloadable MP3 and MP4 archive. You will receive an email once the event is published.
[](https://help.webcasts.com/uploads/images/gallery/2022-05/5hP3hiHmMiK8U7Wh-odstudio-videoslidesplayer-publishallchangesbuttoncircled.jpeg)
# Download the event recording
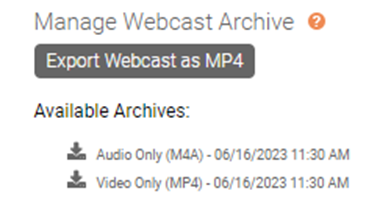
Download recordings of completed Live, On-Demand, or Simulated Live events on the Event Summary tab, under **Manage Webcast Archive**. You can download the event’s video only as a MP4 file (video broadcasts) and the event’s audio only as an M4A (video broadcasts) or MP3 file (telephone broadcasts). You can also download the full event archive, including audio/video and slides, as a MP4.
To download the recording, sign in to the Webcast Admin portal and edit the event.
# Download the full event video
After the Live event or after you publish the On-Demand or Simulated Live event, you can export the full event recording, including audio/video and slides. The amount of time the MP4 takes to process depends on the length of the event.
**Important:** You can't make edits to the event in the editing studio until the recording has finished processing.
**To download the recording as an MP4:**
- Click **Export Webcast as MP4**.
[](https://help.webcasts.com/uploads/images/gallery/2022-05/XHVPpj2s0iDF9LV5-eventrecording-exportmp4button.jpeg)
- A warning window asks if you're sure you want to export the MP4. Click **Yes**.
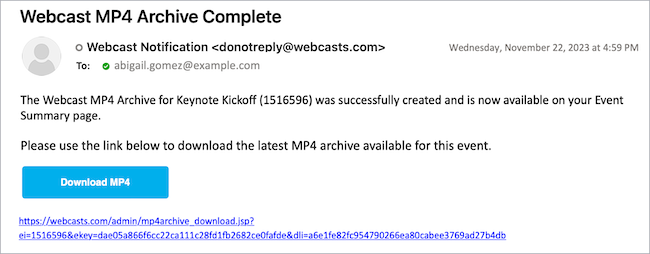
- The recording will begin processing. Once the recording is ready, you'll receive an email, include a link to download the recording, once it is ready to download.
- A link will also be available under **Available Archives**. Click **Full Webcast (MP4)** to save the recording. 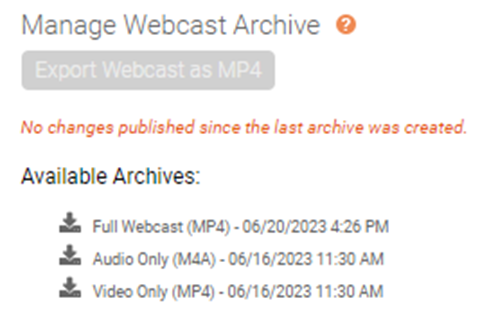
You can also download the MP4 from the MP4 Archive Complete notification email. In the email, click **Download MP4** or copy and paste the link into a browser.
**Note:** The recording can be downloaded a total of 10 times. Once the download limit is exceeded, you must download the recording in the Webcast Admin portal.
[](https://help.webcasts.com/uploads/images/gallery/2022-05/avy8QpCkguEDFeAt-mp4archivecompleteemail.jpeg)
# Download the event's audio/video only files
- Click **Audio Only** to download the currently published audio only recording from the event.
- For telephone events, a MP3 file will be available.
- For video events, a M4A file will be available.
- For video events, click **Video Only** to download the currently published video only recording from the event.
# Record new video clips using On-Demand/Sim-Live Studio
For On-Demand and Simulated Live events, you can use the OD/Sim-Live Studio interface to record new video clips. These clips can be easily swapped into a pre-recorded event to replace or supplement the original recording.
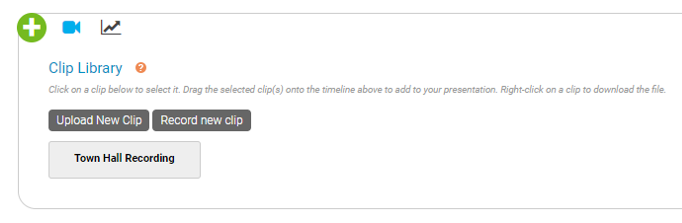
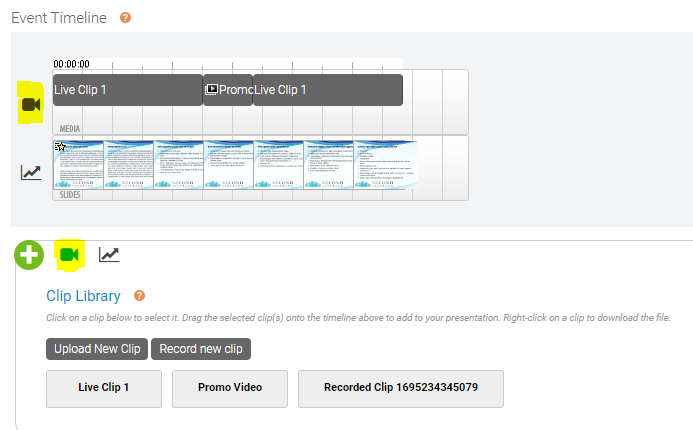
At the bottom of the OD Studio, click on the camera icon to open the **Clips Library**. Available clips will appear here, including recordings from the live event/capture and any video files uploaded to the event.
[](https://help.webcasts.com/uploads/images/gallery/2023-09/Tkq5wqLudaczkTra-image-1695213011014.png)
Click **Record New Clip** to record a clip to be used in the presentation.
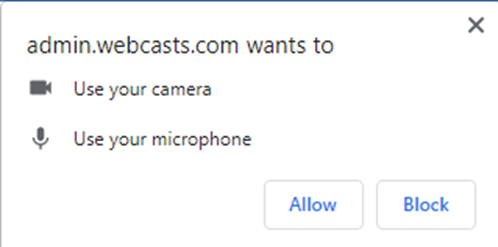
You may be prompted by your browser to allow the recording studio access to your camera and microphone. Click **Allow** if prompted.
The Video Clip Recorder will load. Click **Preview My Camera** to load a preview of your camera.
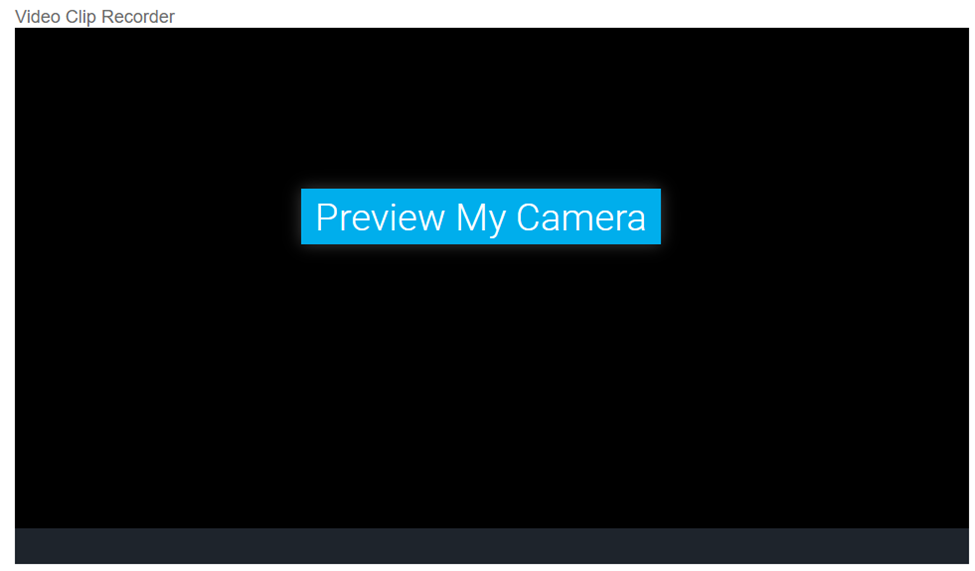
The video window will display a preview using your default camera and microphone sources. Use the **Video Input** and **Audio Input** dropdowns below the video window to select a different camera or microphone source.

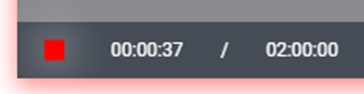
Click on the green circle icon in the lower left corner of the video window to start a recording. When the recording is complete, click on the red square icon in the lower left to stop the recording.
A playback of the recording will display in the video window once complete. Use the play button in the lower left of the video window to preview the clip you just recorded.
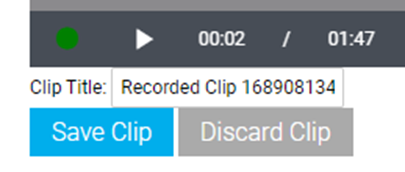
You can update the name in the **Clip Title** field. If you want to save the recording, click **Save Clip**. Click **Discard Clip** if you want to delete the recording. Additional clips can be recorded as required.
Once recordings are saved, they will be available in the **Clip Library** of the On-Demand Studio. Clips can be dragged from the **Clips Library** and dropped on the **Media Clips** track of the Event Timeline. To replace an existing clip with a new recording, right-click on the clip in the Event Timeline and select **Replace Clip**. Select the new recording from the available list.
[](https://help.webcasts.com/uploads/images/gallery/2023-09/XvpayA0fXBl4ZRhX-image-1695307131576.png)
### **Best Practices**
To improve recording quality, we recommend the following best practices:
- Use an external webcam and external microphone or headset, rather than a computer's built-in camera and microphone
- Use a wired internet connection
- Disconnect from VPN and/or remote desktop (if applicable)
# Jump Points
##### **Overview**
**Jump Points** are timestamps in an On-Demand presentation that viewers can easily navigate to when watching. Jump Points are automatically included for each Slide transition and Overlay Video in a presentation. Jump Points can be enabled for Survey and custom Jump Points can be included as well. Below are instructions on how to view and edit Jump Points (for Admins) and how to access Jump Points while watching (for Viewers).
##### **Setup and Editing**
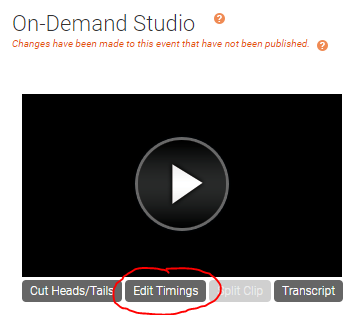
**Jump Point** setup can be access using the **Edit Timings** button below the Video/Headshot window at the top of the On-Demand Studio.
[](https://help.webcasts.com/uploads/images/gallery/2023-09/uvC1mEKWRAymqUzU-image-1695837069595.png)
In the Edit Timings window, a list of all event timings will display, include Slide transitions and any Surveys or Overlay Videos sent. Jump Points are controlled in the **Jump** column along the left. A blue arrow indicates a Jump Point is enabled, while a grey arrow indicates a Jump Point will not display to viewers. Jump Points can be toggled on/off using these controls. The name that appears in the **Title** field is what viewers will see when the access the Jump Points.
[](https://help.webcasts.com/uploads/images/gallery/2023-09/oU2uxBKJ3m9Di0Wy-image-1695837318654.png)
To add a custom Jump Point that is not associated with any existing content, click this button in the top right of the Edit Timings window:
[](https://help.webcasts.com/uploads/images/gallery/2023-09/1dlklcu5ppSHC5wy-image-1695837452018.png)
Add the time you would like the Jump Point to appear in the **Flip Time** field in HH:MM:SS (Hour, Minute, Second) format. Add the name for the Jump Point that viewers will see in the **Title** field.
[](https://help.webcasts.com/uploads/images/gallery/2023-09/bwwQRH5ORMSHhtHN-image-1695837483397.png)
Jump Points for all Overlay Videos will be added by default. Use the checkbox at the bottom of the Edit Timings window to remove these Jump Points instead.
[](https://help.webcasts.com/uploads/images/gallery/2023-09/bTMpXy5S5iFVI0QB-image-1695837624246.png)
Click **Save Changes** to save any changes to the Edit Timings window.
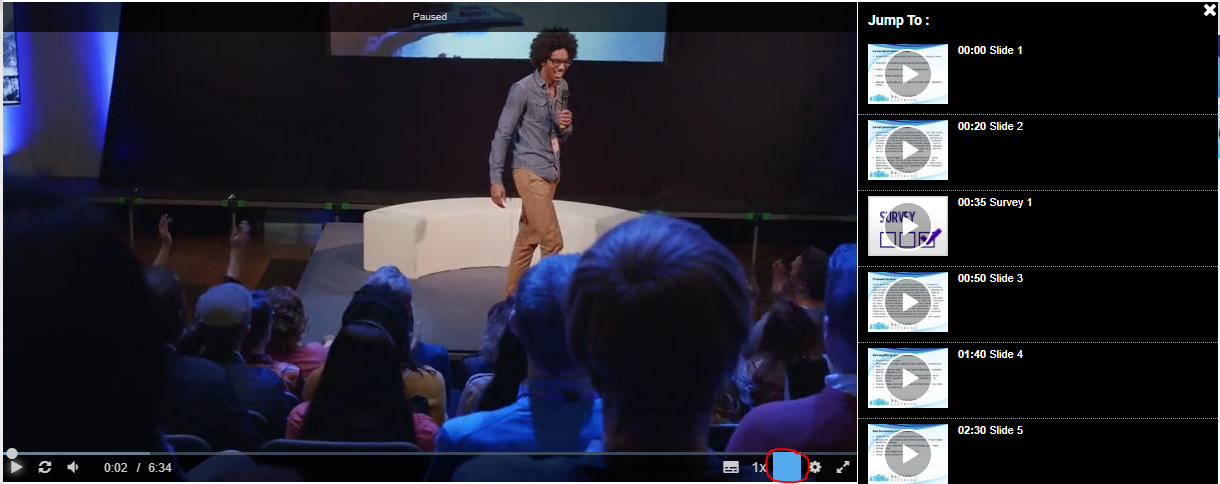
##### **Viewer Experience**
Viewers can access Jump Points by using the button on the lower right of the Video/Headshot window. Hover your cursor over the window to access controls:
[](https://help.webcasts.com/uploads/images/gallery/2023-09/ikU1QqpGF6EsgKHh-image-1695838027166.png)
A list of Jump Points will appear to the right of the window. Viewers can click on a Jump Point to skip to that point in the presentation.