PowerPoint Best Practices
General Best Practices
PowerPoint slides need to be uploaded in advance. Final slides should be uploaded at least 4 hours before your event, but we recommend uploading 24 hours in advance to ensure there is adequate time for processing and review.
Some advanced PowerPoint features are not recommended for use in your presentation. To optimize your slide decks for your Webcast presentation, please use the following as a guideline:
- Use PowerPoint 2007 or later to create your slides
- Save as a .PPT or .PPTX file
- Files are limited to 500 MB in size and 200 slides per deck.
- For Slide Size, use Standard (4:3) or Widescreen (16:9).
- Custom-sized slides will be converted, which may cause the content to be reformatted.
- Remove any "Read-Only" Restriction before uploading the file.
- Remove embedded fonts being used in the slide deck. See below for detailed instructions.
- Remove any password protection from your presentation before uploading the file to ensure the slides can be processed.
- Any security that is required for your presentation can be handled through a variety of other options.
- Do not embed or insert audio or video clips into your PowerPoint presentation.
- Since the platform allows you to speak to the slides in real-time as you present them, any audio clips embedded into your presentation will interfere with your viewers' ability to hear what you are saying on the presentation. Video clips can be added to your presentation as an Overlay video, ensuring that it is optimally displayed to your viewers. Gifs are not officially supported but may work. If your deck includes gifs, please review the slides after uploaded to confirm if the gifs processed correctly.
- When inserting objects into your presentation:
- Make sure to leave the Link box unchecked.
- Make sure that you are set to Insert (Not Link to File or Insert and Link).
- Do not link to external images or spreadsheets.
- Do not use tables created from versions of Excel older than Excel 2007
- Slides should be numbered starting at Slide 1.
- Decks numbered starting at Slide 0 will automatically be renumbered.
- Ungroup any SmartArt objects that may be grouped together. This will ensure that each object is processed and displayed correctly on the presentation.
- Try to keep the background one color and avoid fading or transitional backgrounds. These types of backgrounds do not always convert well and can become pixilated.
- Try to use graphics and backgrounds that use the RGB color palate. Graphics that use the RGB color palette will be displayed as you see them on the screen. The alternative is CMYK, which is used for printing graphics and may appear differently when converted.
- Make sure that the content of your slides is set to use only the defined slide area and does not run off the slide. This will ensure that it displays properly once it is converted.
- By default, the slide processors will always use the first Slide Master. Update the Slide Master order and remove any unused Slide Masters. This will ensure slides display properly once it is converted.
- If you encounter display or formatting issues with an uploaded slide deck, check "Process as Images (No animations)" below the PowerPoint Decks upload to convert the slides to static images. This option maintains the look of the slides but removes any animations included in the slide deck.
PowerPoint Fonts
- Font Size: Your font size should be at least 12 point or higher. Anything smaller could be difficult for the audience to read, even on full screen slides. Fonts must not contain a decimal place. Any decimals will be rounded up to the next whole number.
- Supported Fonts: A list of supported fonts can be accessed here: https://www.microsoft.com/typography/fonts/product.aspx?PID=157
- Custom Fonts: Custom fonts are allowed, but should only be used as necessary. If a custom font is required, please provide the font file(s) in .otf or .ttf format to your Production Manager (for managed events) or Support (for self-service events). Font files should be provided at least 24-hours before the start of the event and will require the PowerPoint presentation to be re-uploaded after the custom fonts have been installed.
- Licensed Fonts: Licensed fonts are not supported by our system. Please change them to another font or remove the license restriction before uploading the presentation.
PowerPoint Animations & Transitions
Most standard PowerPoint Animations are supported with the following exceptions :
- Emphasis Effects:
- Bold Flash
- Underline
- Grow with Color
- Style Emphasis
- Entrance Effects:
- Dissolve In
- Fly In
The platform does not support timed animations. Any animations should be set On Click. Please be sure to remove them from your presentation before uploading.
Most standard PowerPoint transitions are supported, with the following exceptions:
- Bold Reveal
- Box
- Cube
- Doors
- Morph
- Page Curl
- Ripple
Reducing the Size of PowerPoint Files
High resolution images in PPT slides can greatly increase the size of a PowerPoint file when they are embedded within a slide. Here is a quick way to compress the images and reduce the file size substantially, without causing noticeable loss in image quality.
- Open the PowerPoint file.
- From the File menu, select Save As. When the Save As dialog pops up, click Tools to the left of the Save button, and click Compress Pictures.
- Depending on the version of PowerPoint you are using, follow the remaining instructions below.
PowerPoint 2007
- You will receive a dialog box. Click the Options button.
- On the Compression Settings dialog box, select "Automatically perform basic compression on save" and Delete cropped areas of pictures. Choose E-mail (96 ppi) minimize document size for sharing and Click OK.
- On the Compress Pictures dialog box, click OK.
PowerPoint 2010 or 2016
- On the Compress Pictures dialog box, click Delete cropped areas of pictures. Choose E-mail (96 ppi): minimize document for sharing and click OK.
Compression should take just a few seconds, but for files with many images, it could take up to a minute or two to process. Once complete, save the modified file and upload it.
Using Non-PowerPoint Files
Convey requires a PowerPoint file to be uploaded to an event. If you are using another program to create your presentation, refer to the instructions below for exporting the file to PowerPoint:
Keynote (Mac)
- Open the presentation and select File > Export To.
- Choose PowerPoint in the list of export options.
- Click Next and enter a name for the presentation.
- To choose where to save the presentation, click the Where pop-up menu, choose a location, then click Export.
- Open a file in Acrobat.
- Click on the Export PDF tool in the right pane.
- Choose Microsoft PowerPoint as your export format.
- Click Export.
- Name the PowerPoint file and save it in a desired location.
Prezi
- From Edit Mode, select the Share icon from the top menu. Then select Download as a PDF.
- When is ready, you will be prompted to save your Prezi as a PDF file.
- After selecting Save PDF, you will be prompted to name the PDF and choose where to save it. On both Windows and Mac, the default folder is Downloads.
- Once created, refer to the instructions above for converting the PDF to PowerPoint.
Removing Embedded Fonts
PowerPoint slides will need to have embedded fonts removed before the slides are uploaded to an event. Follow the steps below to remove embedded fonts:
- Open the PowerPoint file locally and select Remove Restricted Fonts when prompted.
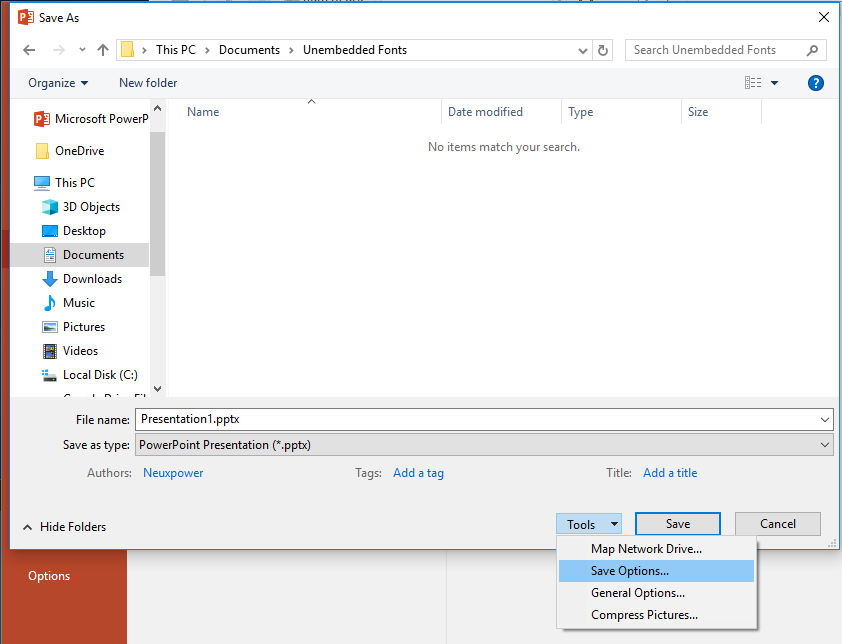
- Click File > Save As. When prompted to save the file, select Tools (next to the Save button) and choose Save Options in the drop down.
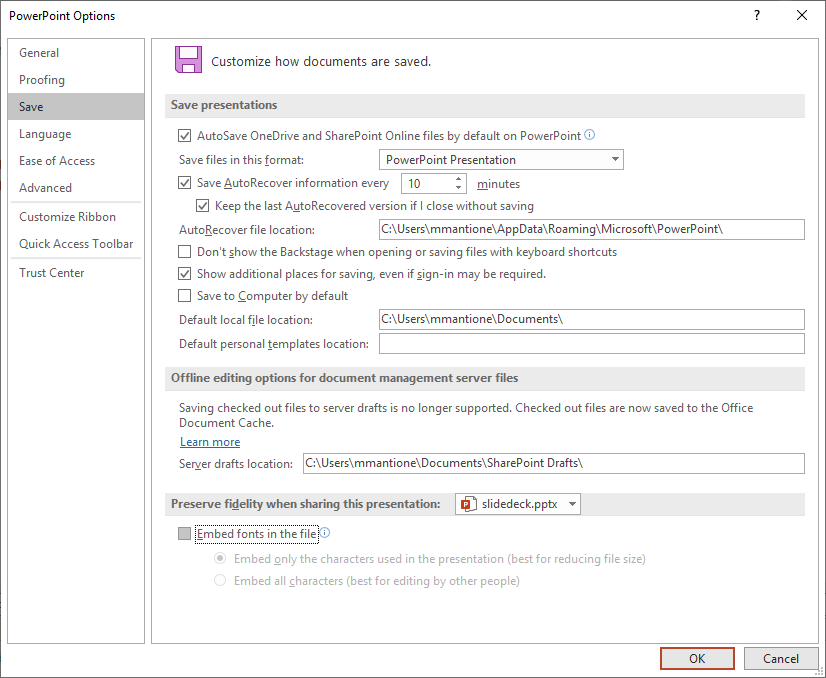
- Uncheck the Embed fonts in the file option under "Preserve fidelity when sharing this presentation".
If custom fonts are being used in the PowerPoint file and are already installed in the Webcast platform, the fonts will load correctly when the PowerPoint is uploaded to the platform. If the fonts are not already installed, the custom font will be converted to a similar font when the PowerPoint is uploaded. Contact Support to provide custom font files for use in your PowerPoint slides.
Last Minute Uploads
PowerPoint slides need to be uploaded in advance. Final slides should be uploaded at least 4 hours before your event, but we recommend uploading 24 hours in advance to ensure there is adequate time for processing and review.
If slides are uploaded after a user has joined the Live Studio, they will need to exit and re-enter the Live Studio to see the updated content. It is recommended to have all presenters manually re-enter the Live Studio once it is confirmed the new slides are available. If presenters do not re-enter the Live Studio after new slides are uploaded, they will see an error message when the "Start Webcast" button is clicked and be forced to refresh, which may impact the start of the event while presenters reconnect.


